Before we get started, you'll need to be a Salesforce Administrator to perform the following steps. If you're not, it may be best to send these instructions to your Salesforce admin.
The general steps to put Salesforce on a TV are as follows:
- Create a Profile for a RocketScreens user.
- Create a Connected App in your Salesforce environment.
- Create a dedicated user for RocketScreens.
- Provide RocketScreens the Salesforce properties you created in steps 1–3.
- Create a Salesforce Dashboard app.
Step 1: Create RocketScreens Profile (JWT Flow Integration)
1. Create the RocketScreens Profile
- In Salesforce Setup, go to Setup → Profiles.
- Click New Profile.
- Choose Clone from an existing base profile, preferably:
- Standard User (recommended)
- Enter:
- Profile Name: RocketScreensV2
- User License: Salesforce
- Click Save.
2. Enable Core Analytics Permissions
Under Administrative Permissions, enable the following:
|
Permission |
Status |
Purpose |
|
View Dashboards in Public Folders |
Checked |
Allows RocketScreens to fetch and render public dashboards. |
|
Manage Dashboards in Public Folders (if visible instead) |
Checked |
Grants control to access dashboard folder structures when required. |
|
View My Team’s Dashboards |
Checked |
Enables shared dashboard access within the org/team. |
|
Run Reports |
Checked |
Required for fetching dashboard-linked report data. |
|
View Reports in Public Folders |
Checked |
Allows access to reports used by dashboards. |
3. Enable Access Policies for Secure Automated Login
Under General User Permissions, enable:
|
Permission |
Status |
Purpose |
|
Skip Device Activation at Login |
Checked |
Prevents Salesforce from enforcing device verification for JWT logins. |
|
Waive Multi-Factor Authentication for Exempt Users |
Checked |
Allows backend authentication from RocketScreens service accounts to bypass MFA (required for JWT integration). |
4. Enable Permissions Related to JWT Flow
To allow RocketScreens backend to authenticate and access Salesforce APIs via JWT, enable:
|
Permission |
Status |
Purpose |
|
API Enabled |
Checked |
Grants RocketScreens backend API access to Salesforce resources. |
|
Apex REST Services |
Checked |
Allows interaction with Salesforce REST and Analytics APIs. |
|
Access to External Client Apps / Modify External Client Credentials (if available) |
Checked |
Enables RocketScreens integration to securely exchange JWT credentials. |
5. Assign the Profile to Integration User
- Go to Setup → Users → Users.
- Edit the user account intended for RocketScreens integration.
- Under Profile, select RocketScreens.
- Click Save.
_____________________________________________________________
Step 2: Create a Salesforce External Client App for RocketScreens v2 (JWT Flow)
1. Log in and Navigate to Setup
- Log into your Salesforce Developer or Production org.
- Click the gear icon → Setup.
- In the Quick Find search box, type External Client App Manager and select it.
2. Create a New External Client App
- Click New External Client App.
- Fill in the Basic Information section:
- External Client App Name: RocketScreensV2
- API Name: RocketScreensV2
- Contact Email: support@rocketscreens.com
- Click Save.
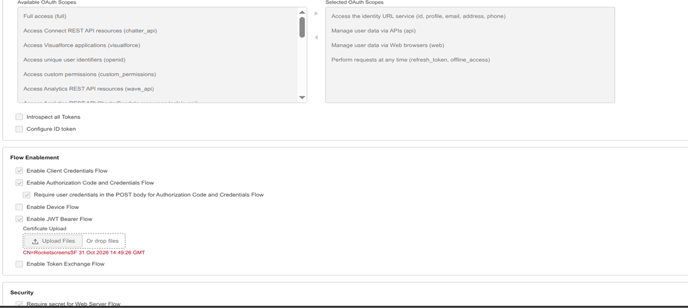
3. Configure OAuth Settings
After saving, scroll to the OAuth Settings section.
- Enable the Enable OAuth Settings
- Set the following:
Callback URL:
https://app.rocketscreens.com/salesforce/callback/
- Under Selected OAuth Scopes, add:
- Access the identity URL service (id, profile, email, address, phone)
- Manage user data via APIs (api)
- Manage user data via Web browsers (web)
- Perform requests on your behalf at any time (refresh_token, offline_access)
4. Configure Flow Enablement
- Scroll to Flow Enablement and check the following options:
- Enable Client Credentials Flow
- Enable Authorization Code and Credentials Flow
- Enable JWT Bearer Flow
- Download the RocketScreens public key certificate from this link.
- Then upload your RocketScreens private key certificate.
5. Configure Security Settings
Under Security:
- Enable Require secret for Web Server Flow
Your configurations should appear as the below screenshot, Click Create.
6. Set OAuth Policies
- Permitted Users: Select Admin approved users are pre-authorized
- OAuth Start URL: Leave blank.
- IP Relaxation: Set to Relax IP restrictions.
7. Set App Policies
- Scroll up to the App Policies
- Under Select Profiles, add:
- RocketScreens
Your policies should appear as per the below screenshot

8. Retrieve the Consumer Key
Once the app is saved, click settings, go to OAuth Settings, Manage Consumer Details and copy the Consumer Key.
__________________________________________________________________
Step 3: Create a RocketScreens User
- The user must be set to Active.
- The Profile of this user should be set to the previously created RocketScreens profile.
- Set the Username to a value easily identifiable as used for RocketScreens.
Example: integration@example.org - All other fields can be set as needed, though ideally should clearly identify the account as belonging to RocketScreens.

__________________________________________________________________
Step 4: Add Salesforce v2 Integration in RocketScreens (JWT Flow)
1. Go to RocketScreens
2. Add a New Salesforce Integration
- Click Add Integration (top-right corner).
- In the pop-up, select Salesforce V2 as the integration type.
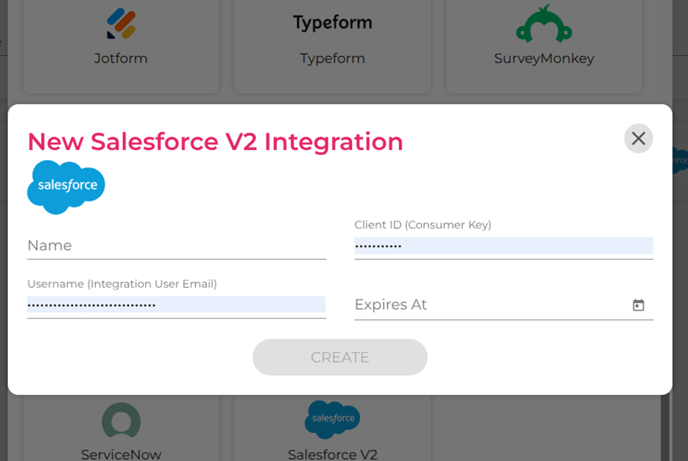
3. Enter Salesforce JWT Integration Details
|
Field |
Description |
Example |
|
Name |
A recognizable name for your integration |
SFv2 - Production Org |
|
Username (Integration User Email) |
The Salesforce username associated with your integration user |
integration@yourorg.com |
|
Client ID (Consumer Key) |
Found under Manage Consumer Details in your Salesforce connected app |
3MVG9g9rFs5T...XYZ |
|
Expires At |
Optional field to set an expiry date for internal tracking (does not affect JWT validity) |
Leave blank |
4. Validate the Integration
- Click Create to initiate validation.
- If successful, the integration tile will appear under Integrations → Salesforce V2.
__________________________________________________________________
Step 5: Showing a Salesforce Dashboard in RocketScreens
1. Set Up a Dashboard App
- Go to the RocketScreens CMS.
- Find the Apps
- Click the New App
- In the new window, search for Salesforce V2 and click the app.
2. Configure the Dashboard
- For the first dropdown, select the Salesforce V2 integration you just created.
- For the next dropdown, select a Salesforce Dashboard.
- Click Save.
Your Salesforce Dashboard will now display live within RocketScreens.