Note: Before getting started, ensure you have administrator access to both RocketScreens and your ServiceNow instance. If not, please share this guide with your ServiceNow administrator.
Here are the general steps to display the ServiceNow platform on a TV:
- Get the RocketScreens callback URL
- Configure OAuth application in ServiceNow
- Set up integration in RocketScreens
- Authorize the connection
- Create and display the ServiceNow dashboard app
Publish to screens
Detailed Explanation:
Step 1: Get the RocketScreens Callback URL
- Log in to RocketScreens.
- Navigate to:
Integrations → Create New → ServiceNow - Copy the Callback URL displayed on the page.
Example:https://app.rocketscreens.com/servicenow/<workspace-id>/callback/
Step 2: Configure ServiceNow OAuth Application
1. Open Application Registries
- Log in to your ServiceNow instance.
- In the Application Navigator, search for:
Application Registries - Navigate to:
System OAuth → Application Registries
Click New
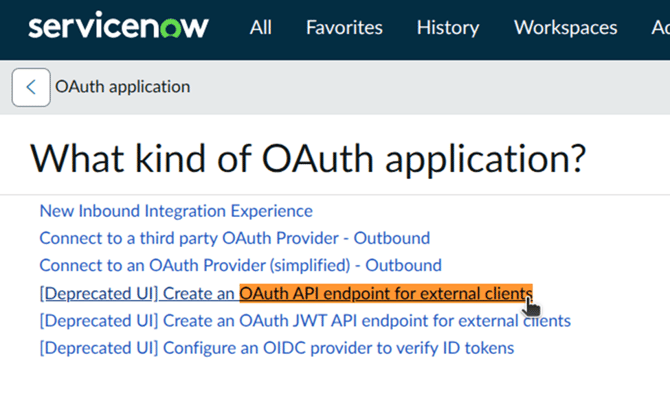
2. Create OAuth Application
- Select:
OAuth API endpoint for external clients
3. Configure the OAuth Application
Fill in the required fields:
Basic Settings
- Name: RocketScreens (or RS)
- Active: Enabled
- Client Type: Integration as a Service
Redirect URL
- Paste the RocketScreens Callback URL copied earlier
Example:
https://app.rocketscreens.com/servicenow/<workspace-id>/callback/

Token Settings
Use the following configuration:
- Token Format: Opaque
- Access Token Lifespan: 1800 (30 Minutes)
- Refresh Token Lifespan: 8640000 (100 Days)
Scope Restriction: Broadly scoped
Auth Scopes
Add a new row:
useraccount
4. Save the OAuth Application
- Click Submit
After saving, ServiceNow will generate:
- Client ID
- Client Secret
Copy both values for later use.
Step 3: Configure Integration in RocketScreens
- Return to RocketScreens.
- Navigate to:
Integrations → Create New → ServiceNow - Click Add Configuration
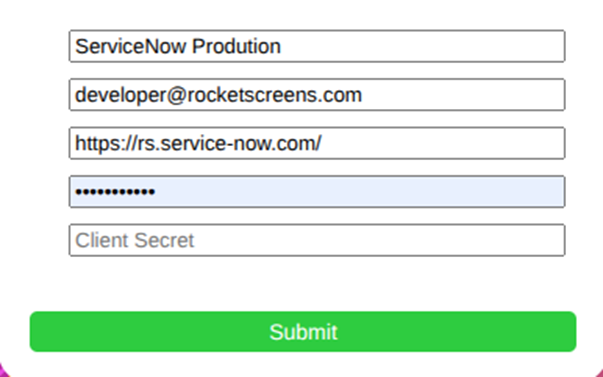
Fill in the following details:
- Environment Name: (e.g., ServiceNow Production)
- ServiceNow Username: Your ServiceNow username ( or you may create a dedicated new user for RocketScreens.)
- App Domain: https://yourcompany.service-now.com
- Client ID: From ServiceNow
- Client Secret: From ServiceNow
Click Submit
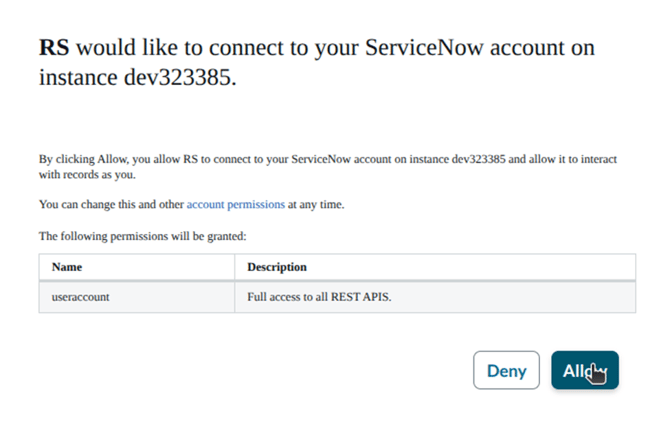
Step 4: Authorize the Integration
- Select the configuration you created
- Click Continue
- You will be redirected to ServiceNow
- Approve the OAuth authorization request
Once completed, you will be redirected back to RocketScreens with a confirmation message.
Step 5: Create a ServiceNow Dashboard App
- Navigate to:
Apps → Create App - Select:
ServiceNow Dashboard - Choose:
- Your ServiceNow integration
- The dashboard you want to display
Save the app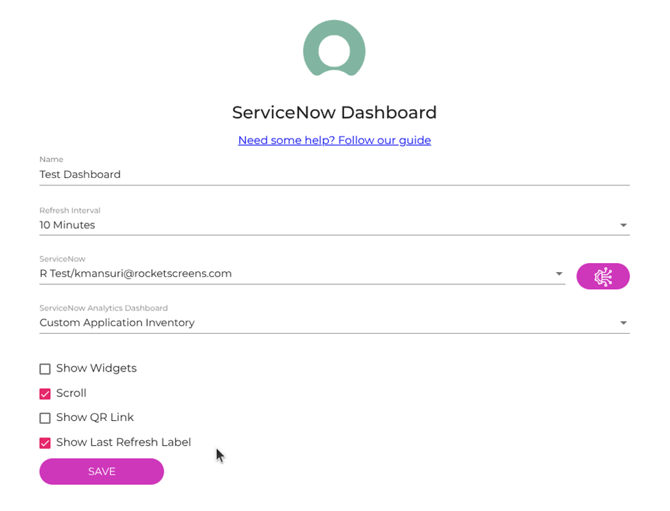
Step 6: Publish to Screens
- Add the app to a playlist or channel
- Publish it to your screens
RocketScreens will automatically refresh the dashboard based on your app configuration.
Final Notes
- Ensure dashboards and reports in ServiceNow are accessible to the configured user
- Allow a few moments for dashboards to render after setup
- Verify screen connectivity if content is not displaying