Before we get started, you'll need to be a Salesforce Administrator to perform the following steps. If you're not, it may be best to send these instructions to your Salesforce admin.
The general steps to put Salesforce on a TV are as follows:
- Create a Connected App in your Salesforce environment.
- Create a Profile for a RocketScreens user.
- Create a dedicated user for RocketScreens.
- Provide RocketScreens the Salesforce properties you created in steps 1-3.
- Perform OAuth with RocketScreens against your Salesforce environment.
- Create a Salesforce Dashboard app.
The steps above might sound complex or make little sense, but we'll walk you through each one.
Step 0. Get your RocketScreens Callback URL
Before we get started in earnest, we need to go into RocketScreens and grab the RocketScreens Callback URL. This is a unique value for your Workspace, and should never be shared with anyone outside of your Organization.
To retrieve this value:
- Go to the RocketScreens CMS.
- Find and select the Integrations tab.
- Click the Add Integration button at the top righthand corner of the page.
- Find the Salesforce integration, select it, and click the Integrate button.
- A new window will open up. Click the green Add Configuration button. If you don't see this button, then your environment is already configured and you can continue to step 5.
- You should now see a page similar to the below screenshot.
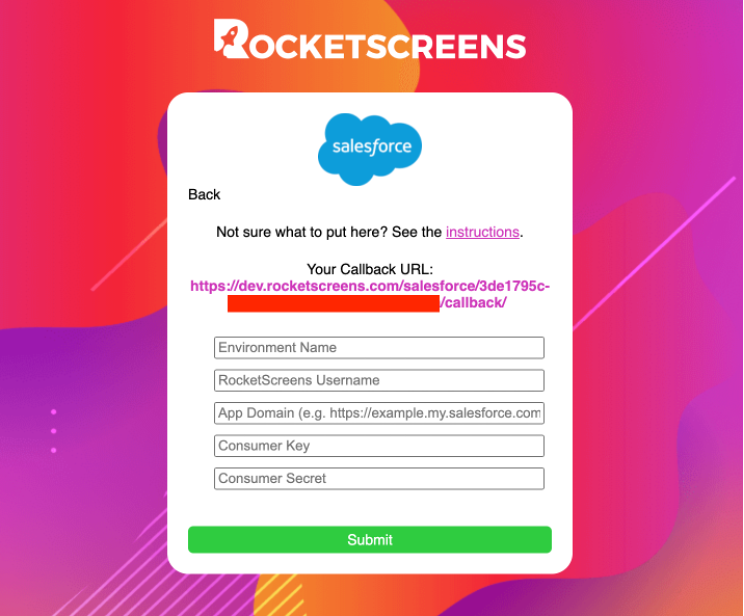
- Copy the provided URL labeled Your Callback URL. In the screenshot, it is the purple obfuscated text.
With this URL we can proceed to Salesforce.
Step 1. Create a Salesforce Connected App
The first thing we need to do is create a Salesforce Connected App.
- Log into Salesforce and go to your Setup.
- Go to the App Manager area.
- Click the button New Connected App.
- In the Basic Information section, enter the provided values below:
- Connected App Name: RocketScreens.
- Contact Email: support@rocketscreens.com.
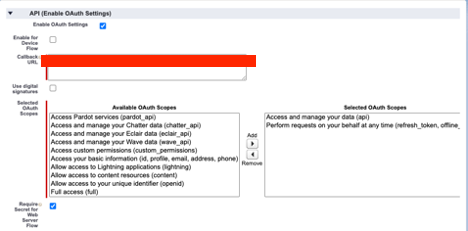
- In the API section, make the following changes:
- Activate the Enable OAuth Settings checkbox.
- Enter the RocketScreens Callback URL we grabbed in Step 0 in the Callback URL field..
- In the Selected OAuth Scopes section, select the following values:
- Manage user data via APIs (api) (This option was once named 'Access and manage your data (api)')
- Perform requests on your behalf at any time (refresh_token, offline_access)
- Activate the Require Secret for Web Server Flow checkbox.
- Your options should appear as the below screenshot
- Scroll to the bottom and click the Save button.
- Once the App is created, we need to open the App page and grab two values, the Consumer Key and the Consumer Secret. These values are sensitive, so don't share them with anyone outside your Organization.
- You may have to first click a button on the App Page, Manage Consumer Details, before accessing these keys.
Keep up with the Consumer Key and the Consumer Secret, we'll need them later. But for now, let's move on to the next step.
Step 2. Create a RocketScreens Profile
Eventually, we're going to create a RocketScreens user, and that user needs a specific set of permissions. The Profile we will create now will be used to provide those permissions. We highly suggest using a dedicated Profile for the RocketScreens user, so as to limit the impact to existing users and improve the security of the integration
To create the profile:
- Navigate to the Profiles page in Salesforce.
- Click the New Profile button.
- Name the Profile RocketScreens.
- Enable the below permissions:
- Dashboards
- Reports
- View Dashboards in Public Folders Or you may see Manage Dashbords in Public Folders.
- View my Team's Dashboards
- Run Reports
- Skip Device Activation at Login
- As a caveat, these permissions may change at any time. In general, you want to give the Profile enough permissions to view and run reports in the system.
- For the last set of steps, find the Login IP Ranges section for the Profile. This may be in one of several places depending on your setup.
- Once found, enter the IP Range specifically provided to you from RocketScreens. If there is no value provided, enter the default value of 34.198.151.100.
- Click Save.
Step 3. Create a RocketScreens User
For the Salesforce integration, RocketScreens requires an assigned user. This user needs to have the following properties:
- The user must be set to Active.
- The Profile of this user should be set to the previously created RocketScreens profile.
- Set the Username to a value easily identifiable as used for RocketScreens. For example, rocketscreens.integration@example.org.
All other fields can be set to other values, though if required it's probably a good idea to make them obviously attributable to RocketScreens.
Step 4: Integrate with RocketScreens
Finally, we can leave Salesforce and start configuring RocketScreens.
Enter the following fields:
- For Environment Name, enter a recognizable name for your Salesforce environment. Something as simple as "prod" would do.
- For RocketScreens Username, enter the Username of the previously created Salesforce user for RocketScreens in Step 3.
- For App Domain, enter the Salesforce domain. For example, https://example.my.salesforce.com.
- For Consumer Key, enter the Consumer Key gathered in Step 1.
- For Consumer Secret, enter the Consumer Secret gathered in Step 1.
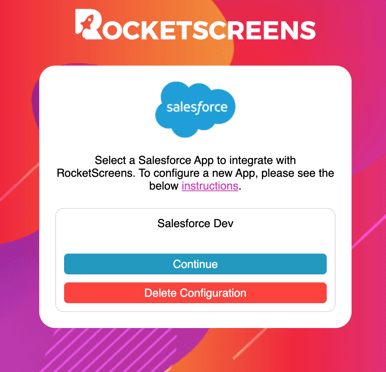
Finally, click Submit! RocketScreens now knows how to communicate with your Salesforce environment! You should see your environment listed with a blue Continue button.
While we're not done yet, we're past the most difficult part. The rest is smooth sailing!
Step 5. Login with OAuth to Salesforce
At this point, you need to login as your Salesforce user (not the RocketScreens user). To do this, perform the following steps:
NOTE: You must either be a Salesforce Administrator or a Delegated Administrator of the RocketScreens user created in Step 3 to do this step. Otherwise your integration will not work correctly.
- Click the blue Continue button.
- You will be taken to a Salesforce login page, or OAuth verification page, similar to the below screenshot.
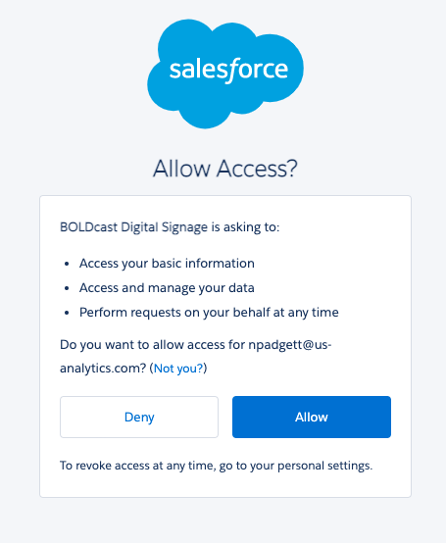
- Click Allow (this is your integration configuration and your Salesforce environment, RocketScreens is only wiring it up to our system).
- If successful, RocketScreens will show you a page saying so!
The integration is now fully complete! The last step is pull one of the Salesforce Dashboards into RocketScreens.
Step 6. Showing a Salesforce Dashboard in RocketScreens
We're home free at this point! The above steps only need to be performed once, and the following steps can be performed for as many Dashboards as you please. The last step is setting up our first Dashboard. To do this:
- Go to the RocketScreens CMS.
- Find the Apps tab.
- Click the New App button.
- In the new window, search for Salesforce and click the App. You should see a window as below:
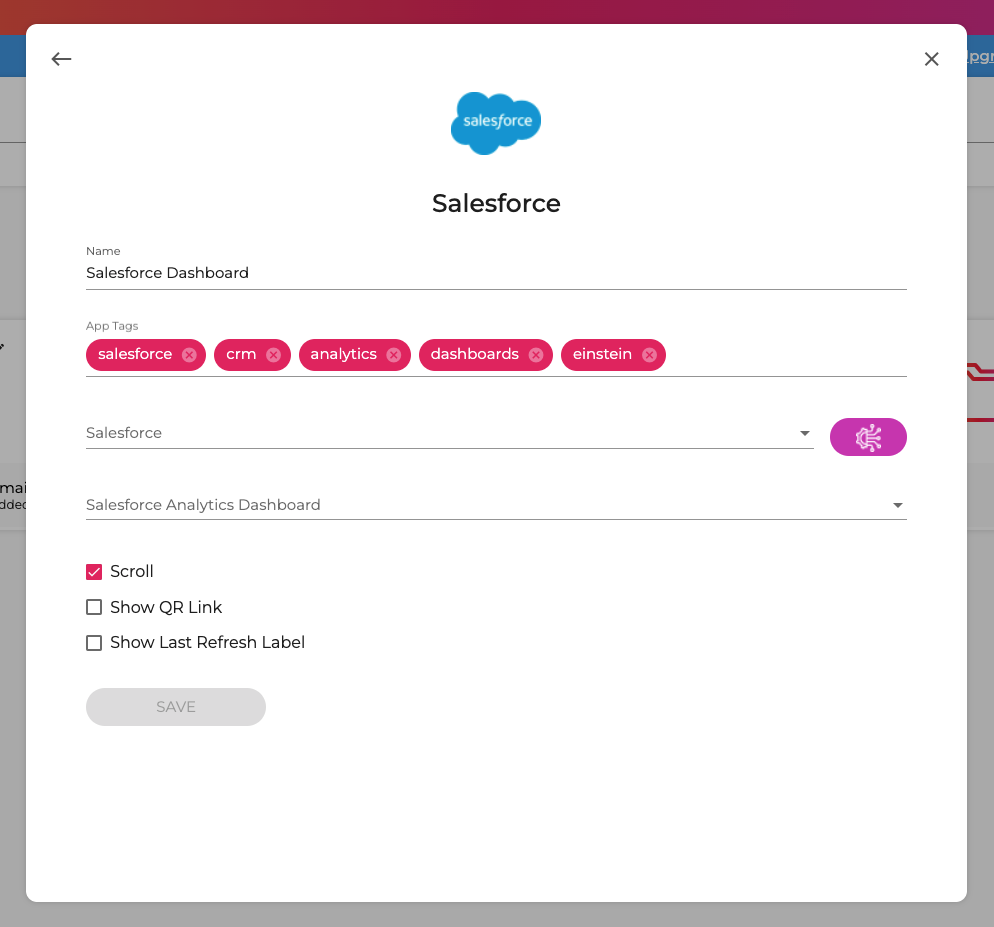
- For the first dropdown field, select the Salesforce integration we just set up.
- For the next dropdown field, select a Salesforce Dashboard.
- Finally, click Save.
Watch The Step by Step Video Here
And that's it! The dashboard may take a moment to render, but clicking the preview icon will show you how your Salesforce Dashboard will show up on a TV.
From here, you can organize this App into a Channel and set up a TV. Not sure how to do that? Check out the other articles in our Knowledge Base!
Still not working as expected? Review the above steps for the accuracy or contact us at support@rocketscreens.com.