Putting your Tableau Workbooks on a TV is easier than it sounds with RocketScreens. In general, we will follow the below steps:
- Generate Personal Access Tokens (PAT) from Tableau.
- Enter the PAT into RocketScreens.
- Create a Tableau App.
Step 1. Generate Tableau Personal Access Tokens
This step is pretty simple, you just need to go into your Tableau account and generate these under your settings.
- Login to your Tableau Online or Tableau Server instance.
- Click your Profile icon, and then select My Account Settings.

- Find the section labeled Personal Access Tokens.
 Enter in a Token Name. Something recognizable like "RocketScreens" will work well.
- Click Create new token
- You will be shown a window with the Token Name (what we already decided) and the Token Secret.

- Copy your Token Secret value. This is the only chance you have to do so. If you don't copy it now, or lose it sometime in the future, you must create a new one.
Now, with both the Token Name and Token Secret, we can provide these to RocketScreens.
Step 2. Enter the PAT into RocketScreens
Now that we have our PAT, we need to provide these to RocketScreens. This is a one-time setup, and is only to tell RocketScreens how to communicate to Tableau.
- Navigate to the RocketScreens CMS.
- Navigate to the Integrations tab.
- Click the Add Integration button.
- Find the Tableau option. Select it.
- Click the Integrate button.
- In the new window, provide the following fields:
- Name: The name of the integration, so it will be easy to find.
- Tableau Site Name: This is only required when using Tableau Online. The Site Name can be pulled out of your Tableau Online URL.
- For example, if your URL is https://10ax.online.tableau.com/#/site/rocketscreensdemo, your Site Name is rocketscreensdemo.
- Tableau Domain: This field is the domain to access your Tableau environment.
- For example, if your URL is https://10ax.online.tableau.com/#/site/rocketscreensdemo, your Site Name is 10ax.online.tableau.com.
-
- Tableau PAT Name: The value we generated in Step 1.
- Tableau PAT Secret: The value we generated in Step 1.
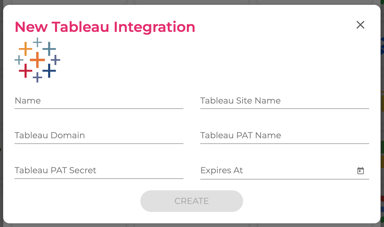
- Then click Create.
Now with the integrations setup, let's get some Tableau Workbooks into RocketScreens!
Step 3. Create a Tableau App
With our Tableau integration configured, now we're free to create as many Tableau Apps as we please!
- Navigate to the RocketScreens CMS.
- Navigate to the Apps tab.
- Click the New App button.
- Search for Tableau.
- Select the app named Tableau Server.
- You will see a window as show below:

- Name your App something easily identifiable; The name of a Workbook makes sense.
- Select your Tableau integration from the first dropdown field.
- Select your Tableau Workbook from the second dropdown field.
- Set the number of seconds you want each page of the Workbook to display.
- Optionally show a QR Code which, when scanned, will bring a user to your Workbook on Tabaleau.
- Optionally show a small label which lists the last time the Workbook was refreshed.
That's it! The Workbook may take a few moments to render, but clicking the preview icon will show you how your content will show up on a TV.
From here, you can organize this App into a Channel and set up a TV. Not sure how to do that? Check out the other articles in our Knowledge Base!
Still not working as expected? Review the above steps for accuracy or contact us at support@rocketscreens.com.