The process for customizing the layout of the Salesforce Events App is technical, yet straightforward. RocketScreens currently only supports HTML layouts, so you'll need some HTML knowledge. Being an expert in HTML isn't a requirement, but it will certainly make it easier to create something which matches your vision closely.
Step 1. Select an Event Type
RocketScreens supports several event types, and each event type may have different data associated with it. For example, an Opportunity may have an Amount, and an Event may have a Location.
It's important to identify which Salesforce Object you will be using, or else your layout may have issues.
Step 2. Identity the fields for the Object Type
Use the list below to identify the fields available for each type:
- Closed Won
- salesforce-profile-image (User Profile Image)
- salesforce-profile-name (User Profile Name)
- salesforce-account-name (Name of attached Account)
- salesforce-event-focus (Where the dollar amount will go. If no amount, the Opportunity name will go here instead.)
- Opportunity Stage
- salesforce-profile-image (User Profile Image)
- salesforce-profile-name (User Profile Name)
- salesforce-account-name (Name of attached Account)
- salesforce-event-demo-focus (The Account Name)
- Event
- salesforce-profile-image (User Profile Image)
- salesforce-profile-name (User Profile Name)
- salesforce-account-name (Name of attached Account)
- salesforce-event-name (Name of Event)
- salesforce-event-location (Location of Event)
- salesforce-event-start (Start date of the Event)
Each of the items listed above are Class Names, in HTML lingo. Each of the class names is associated with a specific value, specified in the parenthesis. Knowing this, we can move to the next step.
Step 3. Create some placeholder HTML.
Let's create some very basic HTML that will let us customize the layout. For demo purposes, we will move forward with the Closed Won App type.
The sample we will continue with can be found below:
<div class="custom-salesforce-bg-1">
    <div class="custom-salesforce-title-1">Closed Deal!</div>
    <div class="custom-salesforce-profile-photo-1 salesforce-profile-image"><img src="/player/assets/js/plugins/salesforce_events/lightning_blue_profile_avatar_200.png"/></div>
    <div class="custom-salesforce-profile-name-1 salesforce-profile-name"></div>
    <div class="custom-salesforce-transitional-text-1">for</div>
    <div class="custom-salesforce-location salesforce-account-name"></div>
    <div class="salesforce-event-focus"></div>
    <div class="custom-hidden salesforce-event-demo-focus"></div>
</div>
Notice the class names for some of the tags (bolded for clarity). We've used the class names shown in the previous step. RocketScreens will look for these predetermined class names, and populate elements with these class names with values from Salesforce.
What about the other class names(italicized for clarity)? These are class names we will use to customize the screen layout. Their names are arbitrary, and can be named whatever you want. Just be careful to name them something unique. What can we do with these class names?
Step 4. Changing the layout of the HTML
Now we get to where most of the work will be; actually organizing the layout fo the page. We will use the class names used above for some customizing:
<style>
    .custom-salesforce-bg-1 {
        background-image: url("https://www.us-analytics.com/hubfs/ezgif.com-gif-maker.webp")
        background-size: cover;
        background-color: #FFF;
        width: 100%;
        height: 100%;
    }

    .custom-salesforce-title-1 {
        font-family: Helvetica;
        font-size: 5vw;
        position: absolute;
        font-weight: 800;
        text-align: center;
        width: 100%;
        top: 10vw;
        color: #FFFFFF;
    }

    .custom-hidden {
        display: none;
    }

</style>
The above code is CSS, which can be added to the above HTML to make the HTML behave according to the styles set in the CSS. This is all standard HTML & CSS, so there shouldn't be anything too surprising here (if you've done it before).
We haven't included all of our classes for brevity, but they would all look similar.
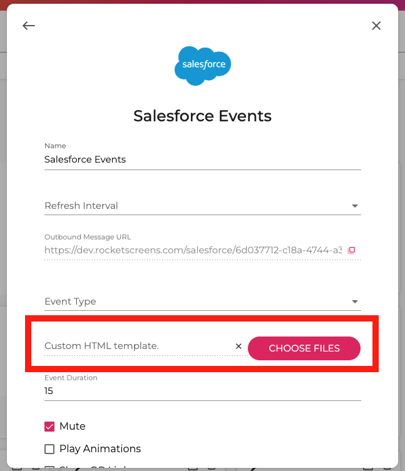
Step 5. Getting the design into RocketScreens
The final step is getting this HTML into RocketScreens and telling our Salesforce Events App to use it. Upload the HTML and CSS as an HTML file to the RocketScreens CMS. This can be done in the Content pane, in the same way as any other uploaded file.
Once uploaded, it can be aded to the App by selecting the file for the Custom HTML template option.
And there you have it!
Some things to know
There are some quirks you may come across with your designs, so let's try to get some of these out of the way.
Dimensions
The size of the screens are force into 16:9 aspect ratio. What does this mean?
- It means your layouts sizing needs to be implemented using VW units (as shown in the example above).
- Additionally, for a horizontal screen, the height can only go to 56.25VW. For a vertical screen, the width can only go to 56.25VW.
Class Names
The custom class names you use should be unique and specific. That means no repeating, even across your different designs. It also means being more terse rather than more ambiguous.
Some examples:
- title (bad)
- sf-title (bad)
- sf-custom-opp-title (good!)
Vertical Screens
RocketScreens currently doesn't utilize any special logic for Vertical vs Horizontal screens with the custom layouts. In order to support Vertical screens, your layout will need to utilize responsive web development techniques.